Friday, May 2, 2008

Blueberry Oatmeal Muffins


This is one of my boys' favorites. I love them as well!

1 2/3 cup rolled oats
1/3 cup all purpose flour
3/4 cup whole wheat flour
3/4 cup packed light brown sugar (I use the Splenda mix)
2 tsp. cinnamon
1 tsp. baking soda
1 tsp. baking powder
3/4 tsp. salt
1 1/2 cup buttermilk
1/4 cup vegetable oil
2 tsp. grated lemon rind
2 large eggs
2 cups frozen blueberries
2 Tbs. granulated sugar(opptional)

Preheat oven to 400 degree. Place oats in food processor; pulse 6 times. Place in large bowl. Add flours and next 5 ingredients (through salt) to oats in bowl. Stir well with a whisk. Make a well in the center of mixture.

Combine buttermilk, oil, rind, and eggs in a bowl; stir well with a whisk. Add to flour mixture, stirring just until moist. Gently fold blueberries into the batter.

Spoon batter into 16 muffin cups coated with cooking spray or foil liners; sprinkle with 2 Tbs. sugar. Bake at 400 degrees for 20 minutes or until muffins spring back when touched in the center. Remove from pans immediately. Place on wire rack to cool. Yield: 16.

Thursday, May 1, 2008

pincushions


I now constantly have a helper when I sew. She is my baby girl and her favorite toy upstairs is the pincushion. I know it's not safe, but she is attracted to mine like a magnet. When I made some pincushions this week for upcoming birthdays, she screamed when I took them away. Finally, I had them downstairs on the bench and she found them right away. I am not sure if this is an early sign for her future in sewing or she just likes to play with sharp objects. Either way, I need to hide them better!

Monday, April 28, 2008

drawing books


When I was in second grade my teacher, Ms. Jenkins, taught us fingerprint drawing. I loved it. I think I still have some fingerprint art that my mom saved of a skeleton that we did for Halloween. When I was at HalfPrice Books the other night (a very cool store) they had the drawing and fingerprint books of Ed Emberley and I realized this is where my second grade teacher got all of her ideas. He teaches you step by step how to draw people, animals, characters, etc. and it is so good for kids. I picked up his Big Red Drawing Book, but can't wait to go back and get his complete collections. I was looking at his website and he has all these crafts and activities for kids for all seasons. Love it. I looked at Amazon.com and they have all of his books and there are a ton more than I thought. My kids are getting some lessons in drawing tonight!

Sunday, April 27, 2008

monkey and ducky

I am up late with my husband because he got a craving to bake something late at night and I need to assist (and taste). Plus, we are watching the Star Wars Sunday on TV and although I have seen them many times and we own them on DVD, I still manage to get enthralled with it all. I thought I would share the template (very hand drawn - kind of shakey!) for the monkey and ducky as well.

For the monkey - the eyes and nostrils are french knots and I just did a back stitch for the inside of the ears, the smile on the mouth, and the little hairs on the top of his head. Make sure you overlap the mouth piece over the head until it looks right. Also, layer the ears behind the head when you go to iron it on to your project.

For the ducky - just a french knot for the eyes and what I didn't show in the photo was that I went back and machine stitched the outline of a wing on his body.

Okay, that's it and these are yours for personal use to have and to share!

applique help

This isn't necessarily a tutorial because I don't have much to tutor on and I am no expert, but I will let you know how I do the applique and what works best for me.

1. I like to use felt, wool if I have it, because it is easy to cut and I have TONS of different colors. But, almost any fabric will work.

2. First you need to draw your pieces on WonderUnder on the paper side. I draw (usually trace) the pieces backwords so that when you put them on the item you are appliquing on they are going to lay the right way. Then, you peel off the paper and iron them on. I try to piece them so that -for example- the ears of the monkey are slightly behind the head and everything is layered correctly. And, follow the directions on the WonderUnder for the length of ironing.

3. Cut out a piece of tear or cut away stablizer (can be purchased where ever they sell WonderUnder, fusible webbing, interfacing, etc.) that is just slightly bigger than you applique and pin to the inside of project. This will help (especially when sewing on knits) to stablize the fabric when sewing a secure stitch with the sewing machine.

4. Use a zig zag stitch to secure the applique on to the project. A small, close zig zag is best.

5. Add any embroidery stitches or embellishments that you want.

6. If I use a lot of stitches and french knots on the back, it tends to add a lot of extra thread and knots on the inside of the project. If I am doing a onesie and know that it will rub against the baby's skin, after I am all finished with the stitches, I cut out a piece of light weight fusible interfacing that is slightly bigger than the stablizer that is already there and follow the directions from the manufacturer to iron it on. This makes a smooth surface and hopefully, protects the baby's skin from all the stitching.

I told my sister, Tanya, that I would put the pattern for the birdie on here. It's only been drawn by my little ol' hand, so it's not perfect, but it will definitely work. I used a backstitch for the legs, a french knot for the eye, and used the sewing machine straight stitch to add detail to the wing.

*This is just for personal use so feel free to use it and share it with others*

P.S. - I don't know how to make a PDF file, so I am hoping you can click on this image and print it out and resize it to the size that you want. I hope it works!


*Something I didn't mention - I did not prewash any of my felt, fabric, or the onesies, but I would highly reccommend doing this as they are going to be washed often and you would hate the first washing to shrink or pull out the stitches on the front. I usually don't do this because I am so excited to sew when I get an idea, it would kill me to wait the whole cycle of the washing machine plus the dryer. But, my new goal and what I have realized is that it is more important to wash all the fabric because whenever you are giving a gift you want it to last the test of time. I found this out when I made my little girl's first Easter dress this year. I didn't wash it and now after just one wash, it is too small. Here's a tip - *If you wash your fabrics right when you get them, they will be all ready to go when you finally use them in a project. Since I was asked, I thought it was worth mentioning!

the applique goes on


I love creating these little onesies for baby gifts. I actually don't have a lot of friends having babies right now, but I think my sister's pregnancy is inspiring me. I think I am getting old though because I used to have baby showers to go to every month if not a few, but now the number is shrinking. I think that means that my friends my age are done having babies and now we are moving on. I think it's a little sad, but I am sure that the next stage coming that doesn't involve waking up every two hours to feed a baby will be exciting. We'll just have to see. Anyway, I tried to take a nap yesterday and instead layed there thinking of all the animals I could draw to applique on onesies. Once the wheels start turning, then sleep, especially naps, can be thrown out the window. I managed to get two completely done and one in the works still.

Tuesday, April 22, 2008


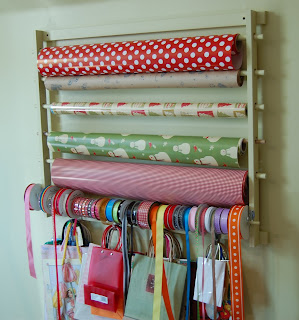
My play room (not a craft/sewing room because I share it with so many) is coming along. It is still *slightly* at a stand still because the dad of the family has dry wall to finish in the corner that I am not showing you. It has a stage built in that corner as well that is just waiting for kids to perform on, but that will have to be in the future. For now, my play room has a corner for my sewing machine, fabric, crafts and odds and ends. I finally got the gift wrap organizer up that I made in December and I found that I need even more room for ribbon. I think I am addicted to ribbon and didn't even know it. I will have to add another dowel rod somewhere to add the other 10 spools of ribbon that I am keeping in a basket for now. I would love to paint the whole room a shade of aqua when the dry wall is done. That would be a good color because the other half of the room which I didn't occupy is for the kids play area. Plus, with IKEA now in Cincinnti, we can get it organized and make it cute at the same time. Here's to the future...Oh, and here's an apron that I made as a thank you to a friend who so kindly took me to the Michael Buble concert last month. And, a bag I made from Jodie's tutorial at Ric Rac for another friend who told me she liked the 1st bag I made. All you have to do is say you like something and then I go and make it (sometimes)!

Friday, April 18, 2008

taking a stab at applique


I was invited to a friend's baby shower this week and I wanted to make her something special. I wanted to applique on a onesie to match these little pants that I got at the Gap Clearance Center for *shhhh* .25! I only bought 4 pair. What was I thinking? For that price, I should have just scooped up the whole rack. The regrets of a good deal not had still linger....and I will just have to make do with the few that I did buy. Anyhow, I digress (tends to happen when talking about bargain shopping)... I did draw up a cute birdie and appliqued it on the onesie and really loved how it turned out. This morning I made one more to go with the other pair of pink pants I bought. I would love to put these on some bibs too to match. Too cute. It makes me want to go and have another baby just to make her a cute onesie. That's if I would have another her and we all know the chances of that are slim with 3 boys I had before the she came! I could always make some cute little boys ones too. That will be my next project since I have like 5 pair of little boy pants that are just calling for a onesie to go with them. Let me think about what cute applique I could put on the boys sets....

Monday, April 14, 2008

fonts

Get your handwriting made into a font here at www.kevinandamanda.com. She is still accepting handwriting and you can get it done for free. There's nothing better than free!!! Plus, she offers all the handwriting she has made in to fonts there to download for free and she has some really cute ones of her own to download here. Do it!

spring break

This week for the boys' Spring Break I was sick. I am still so tired, but that will have to be solved with some sleep - which I am trying hard to get. I did manage to get these bibs made for my sister who is having her first baby. I got the pattern here from Nested. I am so excited for her and her husband. I got these barrettes done for Gage's little friend who was celebrating her 3rd birthday.


We did try to do some fun things during Spring Break. Boston got these for Valentine's Day and the Easter Bunny brought him a package of new patterns, so we tried to make some on Saturday. Gage's is the multi colored dolphin. Boston started one, but got frustrated. They do take a little time and some delicate hands. Trevor decided that he is going to make some Nintendo figures, but we need a bigger square template to do it so we are heading to the store later. Gage and I made the cat together which he named "cat." I made the turtle. I loved making these. Of course, it reminds me of my childhood. We are really trying to make more things around here, but with 3 boys and the love of video games that can be like pulling teeth sometimes. I am going to just have other options available for them to do everyday -if you know what I mean!

Sunday, April 6, 2008

pennant(s)


Where does the time go? Was it me or did Easter come way too fast this year? I wasn't even ready for it, but I still tried to get some decorations made for it. Well, the day or two before I thought I would make an Easter pennant really quick and then I had the brilliant idea to make one two sided that had a St. Patrick's Day theme so I could get two times the use out of it. I finally had it sewn together and was ready to sew the bias tape at the top and as I laid it out I realized it would have said, "Easter" on one side and "ykcul os" on the other - translation "so lucky" backwords because I didn't do it right. I unpicked the whole thing and just made two separate ones. How come the easiest projects take the longest? I think I will whip something up and then I don't realize I have to spell backwords to make it all work! Oh, I was not so lucky with this one, but they did turn out cute still.

Thursday, April 3, 2008

just a few more


You could go a million directions with these. I thought about adding ribbon, but that will be a someday project when I am not just making these for a future baby gift, but for a new niece or nephew.

Wednesday, March 26, 2008

spit up anyone?


I wish I would have had cute burb rags when I had a newborn. If you have to clean up spit up, why not have something pretty to do it with? I found this tutorial on the Michael Miller blog and tried a few with just the scraps of fabric I had. I printed some vintage images on iron on transfer paper and then ironed them on some cotton canvas fabric just to add a little something extra. Since I finished these ones this morning, I have printed out some more vintage pictures and I am excited to put them on more fabric. So, the factory is in full swing!

Sunday, March 23, 2008

one more apron


My friend, Kim, in Texas was having a fund raiser and needed some hand made goods to sell, so I sewed another apron. I tried to revamp my apron pattern by adding a flounce and I love the flounce, but I think I will switch up the top by the neck line for next time. I want to get this pattern perfect.

Friday, March 14, 2008

another tote that needed a re-do


I started making a little tote for me niece, Sadie, for her birthday that is coming up and it went so wrong. I decided to put some fabrics together to make one piece and these were heavy fabrics. Then, I added backing (just as the pattern said) and then, I added a reverseable fabric. I shoved that big wad in to my sewing machine and broke 3 needles and couldn't get the fabric to even move. I had to come up with another plan. I unpicked all that I had done and decided to take a different route. I just added a liner and made one similar to my bag from Jodie's tutorial. I think it turned out pretty cute and hopefully, a 12 year old will like it. I know this 30 something will steal it if she doesn't!

bunnies everywhere


I don't have any Easter decorations. Well, any that I have had in the past have been tossed over the years and I am not much for pastel. But, I found the cute wee bunny pattern at wee wonderfuls. I made one for each member of the family (six) and it was so easy. I do need a good shelf to put them on right in the entryway, so build one honey! They are on the piano for now. I have 5 completely done and mine is still upstairs and as Gage says, "it still needs it's bum sewed up." But that should be resolved soon enough.

Friday, March 7, 2008

signature testing

It doesn't look like my signature, but until I can figure out how to get my own at the bottom, it will do. Just testing to see if this works before I go to bed. I got the signature from My Live Signature.

new borders

Last night when Jamie was talking about blogs she said she just googled anything she wanted to learn how to do in order to change up her blog. I decided to give that a try since I wanted borders around my posts and sidebar. I just googled it and found directions here at Mom's Who Blog as well as some other tutorials on how to make this blog a little fancier. You don't even have to make the border white, but can change it to your color choice. I can't believe how much you can find even when you type a full sentence like- "how to add borders to my photos and posts." I am learning that if there is anything you want to know, don't hesitate to ask the google genie.

Tuesday, March 4, 2008

sew easy - i don't think so


I have come to realize that the art of sewing isn't really in the fabric selection or pattern selection. It is not even in the dreaming up a something really beautiful. It is in following a straight line and making sure you are catching the right fabrics along the way. When I think of sewing, I think of all the creative, wonderful things you can make. But, what I didn't realize is that it takes a brain that likes to follow directions (me- not so much) to have a project turn out nice. Exhibit A - this dress. I loved the pattern and the fabric and the pattern said, "Sew Easy." Yeah, so easy for some people. They put a zipper in it, teeny tiny bias tape for the arm holes, millions of ruffles, and facing. That's not what I would consider easy. Fabric bags - now those are easy. Curtains - easy. You sew seems and long straight lines. But, after all of this, I did enjoy the challenge of doing something I had never done before - like the zipper. I was always so scared of those. Turns out my machine has a zipper foot and it was pretty easy once I read the directions. Okay, for all you seamstresses out there, this would be easy, but for me it was an accomplishment and for that - I am glad it is over and am ready to start the next "sew easy" project and I think I will take baby steps to the advanced sewing stage!

Sunday, March 2, 2008

done

I am done playing with headers. I was never happy with the ones I made, but this one is simple and will do...for now.