Friday, February 27, 2009

still sewing


I have finally been sewing again. I easily find other things to do and then when I get back to sewing, it feels so good. I am still waiting for the day when my lines look a little straighter, but in the mean time, I will be satisfied with the seams staying together! I made a reversible apron for my friend's birthday. I followed the dimensions for the apron from one found in this book . I love the lines, but I didn't like where the waist fell. The ties were a bit low. So, next time I will have to alter it a bit. I still like the colors of the fabric though.


I have a friend that grew up down the street from me. We walked to school every day together and got in to trouble together too. She was my best friend all through school. She told me that her daughter would love an apron and she was a girly girl who liked pink. So, I tried to make the girliest apron I could. For me, that doesn't mean that it is going to be extremely girly, because that is just too much. I had to add brown to balance out all of the pink. I like the way it turned out and I think I will put the dimensions of the pattern on here soon because it was fun to figure out. It's reversible - cupcake on one side and the initial P for Paige on the other.

Also, I picked up a couple of cool things to keep the creative juices flowing. I got the wavy Fiskars fabric shears to use when I make my banners. I wanted the scalloped ones, but everyone is sold out or doesn't sell them anymore. That might have to be an ebay find for me.

Then, I saw this book at JoAnn's last night. I had seen a few glimpses of it on other blogs and picked it up because really, it is beautiful to look at. I didn't look too deep because I wanted to save some of the looking for later when I need a pick me up. I do that. I skim over my magazines and books so that I can go back later and really dig when I need a creative outlet.

Sunday, February 22, 2009

praline turtle cake


I wish that I could say that this was my recipe, but it's not. It is sooooooo good. I made it for my friend's birthday on Friday and well worth the time it took. I saved one piece and gave it to my husband that night and he wasn't in to it, so I took it back from him and ate it myself. I don't think he appreciated the chocolate goodness. It's from Country Living and it's one of those I have saved, but have been waiting for an occasion to make it for. The photo is from the magazine since I didn't take one myself.


Praline Turtle Cake
From Country Living
Country Living shares this winning recipe from our "Mom's Best Cake Contest."

INGREDIENTS
1/2 cup butter
1 cup brown sugar
1 can (14 ounces) sweetened condensed milk
1 cup chopped pecans
2 cup all-purpose flour
3/4 cup unsweetened cocoa
2 cup granulated sugar
1 1/2 teaspoons baking soda
1 teaspoon salt
2 large eggs
1 cup sour cream
1/2 cup canola oil
1 teaspoon vanilla extract
1 teaspoon white vinegar
1/2 cup fudge topping
1/2 cup chocolate chips, melted

DIRECTIONS
Make the cake: Heat oven to 350 degrees F. Butter the bottoms of two 9-inch round cake pans and fit a circle of parchment paper large enough to cover 1 inch up the side of each cake pan. Heat the butter, brown sugar, and sweetened condensed milk in a 2-quart saucepan over medium heat until the butter melts and the sugar is dissolved. Do not boil. Divide the sugar mixture between the prepared pans. Sprinkle 3/4 cup pecans over sugar mixture and set aside to cool. Combine the flour, cocoa, granulated sugar, baking powder, baking soda, and salt together in a large bowl. Add the eggs, sour cream, oil, vanilla, and vinegar, and 1 cup hot water and mix with a wooden spoon until the batter is smooth. Pour the batter into the cake pans -- over sugar mixture -- and bake until a wooden skewer inserted into the cake center comes out clean -- 35 to 40 minutes. Cool cakes in the pans for 10 minutes. Run a knife around the edge of the pans and turn cakes out onto a cooling rack. Remove the paper and cool completely.
Assemble the cake: Spread the fudge topping over the sugar mixture side of one cake layer. Place the second layer over the first and drizzle with the melted chocolate and the remaining 1/4 cup pecans. Frost the cake sides with your favorite chocolate icing*.
*I used a chocolate buttercream frosting - 3 squares melted baking chocolate, 3 cups powder sugar, 1 tsp. vanilla, 1/3 cup softened butter, and 1 to Tbs. milk.

pincushion tutorial


Here is the tutorial for the simple pincushions I made for the last giveaway. I love them because they are so easy and you can always embellish them or keep them super simple. Here is what you need:

9 inch circle of fabric
embroidery floss in any coordinating colors
long doll needle
batting
1 covered button that you have covered with fabric for the top and 1 button for the
bottom
one piece of felt cut in to a circle the will cover the top


1. Take your chosen fabric and cut out the 9 inch circle.


2. Take your embroidery floss (I use 3 strands) and fold the edge of the circle 1/4 inch in and make a running stitch all the way around. Pull it like you are making a yo yo.


3. Stuff with batting. Stuff pretty well, but I always add more later.


4. This is the part that looks really crazy, but it works for me. Take the remaining floss and just sew across the top pretty well. This helps me feel like it is secure. Tie is off. This is wear I add a bit more stuffing through the spaces in the embroidery floss.


5. Get your piece of felt for the top. I just use acrylic felt because it is cheap and comes in tons of colors. Plus, I'm cheap and I don't think my pins mind being put into acrylic instead of wool. Oh, for the size of the circle of felt for the top, just use the top of a jar. I found one that is large enough to cover the hole at the top. Use a fabric pin to trace around it and cut it out.


6. Get a really long piece of embroidery floss that you will use to decoratively divide the cushion in 6 parts. I tie a big knot and start at the top and go through the bottom in the center and come back around to the center. Then I go back through and do the side opposite until I have made six sections.


7. Now, get your buttons, more embroidery floss (a really long piece again) and your long doll needle. I like to use the large covered button for the top, but I only had the medium size buttons when I made these pin cushions. The large ones are really cute. Anyways, set your felt on the top. Start at the top center and go through the pin cushion (it's thick and this is where the long needle really helps) and find the approximate center on the bottom where the button is waiting for you. Go through the button on the bottom and then set the covered button on the top to go through. Do this several times pulling as you go so that it indents a little and makes the pincushion take the shape of a pumpkin. After you have secured both buttons (I usually go through each one about 4 times) wrap the floss around the top of the covered button and tie a knot.


8. Get another long piece of floss that you are going to use for the whip stitch around the felt on the top. You can also do a blanket stitch, but I do a whip stitch because it's faster for me. Stitch the felt on and you are done!

Thursday, February 19, 2009

coffee dying tags


Quickly, I was just going to let you know how I coffee dyed the tags that I sent on my giveaway packages. I made a ton of these last year for Christmas gifts. I had a tag factory going and I even got my mom to join in when she came to visit in December. It is so easy -

You'll need:
Spray Bottle
Instant Coffee
Rubber Gloves
Manila Shipping Tags


Just dissolve 2 Tbs. instant coffee into 1/2 cup hot water and pour into the spray bottle. In the sink, spray the tags and rub in on both sides. This gets messy, so wear the rubber gloves and keep it in the sink. Lay the wet tags on a lined cookie sheet and bake in the oven at 200 degrees with the oven door ajar. Flip them when they are dry on one side. I sometimes spray them again when they are in the oven to fill in the dry spots and to give them a distressed affect. When dry, lay them on an old towel. When they are completely dry, they will curl up a bit. I just cover them with an old rag and take an iron to them. The rag protects the iron from getting the coffee stain on them and also protects the paper tag from getting burned. Okay, that's all there is to it. I made bundles of these that I stamped with vintage Christmas images and gave to friends for Christmas last year. Great gifts.

Wednesday, February 18, 2009

winning my own giveaway


Okay, I didn't exactly win my own giveaway, but I was blessed with something great from it. Megan, who won the last giveaway I had, sent me a thank you gift. You don't have to thank someone when you get what they were intending to give away. But, it was such a sweet treat. I love surprises in the mail. Man, I think that may be why I do the giveaways - just to send things in the mail because I know how much I like getting them myself. When I was in high school, I had several pen pals and wrote to former exchange students. My dear friend, Karyn, is one of the girls that came and stayed as an exchange student in high school from Australia. To this day we still write and send packages to one another for Christmas and our birthdays. Anyways, Megan sent cute felt hair clips for Mallory and great pendants made from Scrabble tiles. I was going to order some of these from etsy and I was pleasantly surprised to get them from her. So cute - all of it. Because I got a package, I think I might have another giveaway soon. It's an addiction.

Tuesday, February 17, 2009

a few tags


I made these the week of Valentines and didn't have the chance to attach them to any gift. Sad, but I will just hang on to them until next year. I got the vintage images from here at Altered Stuff.

vintage find


I found this cute fabric at the flea market (it's really an inside store with booths, but they call it a flea market). I LOVED IT. Look at that cute donkey sipping his soda! But, now I don't know what I want to make with it. That happens when I find something I really love. Instead of just jumping in and using it, I hang on to it waiting to use it in the "best" project. But, we all know, there is no best project. I am thinking I will use it in a tote, but I am still thinking...

Friday, February 13, 2009

simple eye glass case

We had our Valentines Dinner early - last night. I know Saturdays tend to get busy around here and it worked out with my husband's schedule for that night. We had steak, potatoes, sliced strawberries, tomato basil soup, and cherry lime-ades. I let the kids decorate sugar cookies for dessert. Nothing fancy, just fun. I was wrapping the little gifts I had for my kids that afternoon and realized that we had invited my mother in law and I didn't have anything for her. So, I found a project that I was going to make her for Christmas, but had to skip because of time.


If you are interested in the basic directions, keep reading, otherwise - I hope your Valentines Day is amazing tomorrow!

4 pieces of fabric 5" wide by 7 1/2" tall - 2 for the lining and 2 for the outside
2 pieces of batting 5" wide by 7 1/2" tall
1 piece of twill tape
fabric ink pen and stamps
ric rac or any other embellishments
I used a 1/2" seam on all seams

1. I took a small piece of twill tape and stamped "glasses" with fabric ink and attached to the piece of fabric I was using for the front.
2. I sandwiched the two lining fabrics and batting together - right sides (it went batting, fabric, fabric, batting)- and sewed around 3 sides (leaving the top open), clipped the corners and turned it right side out. So, I had the lining fabric on the outsides with the batting inside.
3. I sewed around the 3 sides of the outside fabric - leaving it inside out. I also clipped the corners here too.
4. I then placed the lining inside the outside sewn pieces so the the right sides were touching.
5. I sewed around the top leaving a turning space that allowed me to pull the fabrics through - about 2 inches.
6. Once through, I stuffed the lining back in to the outside and pressed the opening closed.
7. Finally, I sewed around the top with a 1/4 inch top stitch.

It's just like making a mini tote bag without any handles. If you have made a tote, this will be simple for you, but if not I will explain it in more detail if you want - just contact me!

Tuesday, February 10, 2009

randoms


I needed to figure out a gift for my nephew last week. Boys are sometimes hard to sew or craft for, I will admit. If I had enough of that Pokemon fabric left, I could have made pj bottoms, but we used most of that pretty quickly. So, at Michaels I found their sketch books on sale and my boys had been given sketch books and pencils for their birthdays last November and they loved them. They put them by their bed to draw at night or take them with us when we are going on longer drives. So, I bought one for my nephew Graeme and just fixed it up a bit. I added a stamped page with his name on in and then made a slip cover for the back which had a pocket with a snap on it to put all his pencils in. Easy and I hope he likes to draw as much as my boys do.

Then, I was at my friend's and saw her Valentine banner hanging on her mantel. To say that I loved it would be an understatement. I really loved it and told her. To that she said, "Good. I am glad you like it because I made one for you too and I have it downstairs." Dream come true and super sweet of my friend. It now hangs in my dining room from hooks that once had wreaths on them, but have been empty waiting for this banner, I think!

Also, Jellie (my sister)....here's your wedding present. So, do you still want it although you got married two years ago? Ha, well, I am sometimes slow at gift giving, but I did know that I had something that I was making for you, it just took a bit for me to put it together. So, when you are back from Hawaii and have some permanent roots, I will send it to you.


Here are a few more of the Sweet blocks. I ended up getting five of them made and did keep one for myself. Sometimes I forget to, but this time I am glad that I did.

Thursday, February 5, 2009

i promise, i am almost done with valentines day - maybe


It's almost here, so that means I am almost done. There are just so many cute ideas out there and what else is there to do during the frozen times of winter? Now, I don't decorate much for Easter, but you never know, I could hit another stride and start making an entire new collection of beauties! I made a few felt hair clips for my daughter. These are just too easy not to make. I bought a bag of heart buttons at the craft store so I have many to work with.


One of my "go to" crafts that I tend to make are stenciled blocks. My husband is a home builder and we have many pieces of wood in the garage that I confiscate and cut into pieces. I print the words on a overhead projector transfer sheet and then cut out with an exacto knife. I just stenciled "Sweet" on these and then stenciled a heart at the end. I wrapped yarns and ribbon around then and added a felt heart tied to the top. Easy and I made the stencil last year and it was good to go for another 4 blocks this year - although it has almost bit the dust.

Wednesday, February 4, 2009

martha's cute idea


When we had the ice storm we had a power surge before the power was gone for good, and ever since then our computer is not itself. I have been using my husband's laptop when he comes home from work. I am trying to convince him that I need a laptop too since our home computer needs to have a schedule to it with the kids taking over for all these *amazing* computer games (thanks Webkinz). We'll see if I get far with that. Anyway, I guess I was saying all that because I have all my photo editing programs on that computer - not that I use them that much, but I would love them to be helping me out a bit or at least cropping my photos. So, don't mind the extra space around the photos.

Do you get Martha's idea of the day emailed to you? Or cookie of the day? She always has some great ones. Today it was her handmade heart doilies. Very cute.


Also, the giveaways have been mailed to the winners. So, look for them in the mail at the end of the week. Would it be crazy if I had another one soon? I could just have a giveaway blog. We'll see...

Tuesday, February 3, 2009

first knitting project


This heart potholder is my first official knitting project that I finished while my mom was visiting. You can find the pattern here at the Lion Brand website. Did you see that mom? You didn't have to buy it for a whole .49 cents at the local craft store. It was free the whole time. It says easy, but it does have some weird stitches in it and is a little more difficult than a scarf. But, really have I made a scarf? Nah, so maybe I don't know what I am talking about. I just know that I made something and it resembles this!!

Also, for those who wanted to know, I got the square glass marbles from the local dollar store - Dollar Tree. And, now that I know that they are rare, I think I will go and buy some more.

Monday, February 2, 2009

swirly heart crayons

I bought these ice cube trays at the dollar section at Target. I also saw them at the dollar store the next day - pretty popular little guys! I have wanted to get rid of all our crayon nubbins. And, while I didn't get rid of all of them, I did make a dent in the red, pink, white, and orange ones. I broke them up and put them in the heart trays. I put them in the oven at 250 for about 15 minutes. When they cooled I popped them out. I think I will give them to my little guy's friends for Valentines Day with a pad of paper. Now, I don't know how easily I can get that crayon film off of the mold, but if I can't it will be designated for dirty crafts only and that's okay because they came in sets of two trays and I didn't touch the other one...yet.

glass marble magnets

I was making a few things for the other winners of the giveaway and thought I would share with you how I made them. Okay, now this is a simple craft that probably doesn't require much in terms of directions, but I will just show you the steps. These magnets make great gift for friend and teachers. I made them with little round glass marbles that can be found at any craft store by the florals and with cool square marbles that I happened to find at the Dollar Tree.


Here's what you need for both:
glass marbles
patterned paper
Mod Podge - matte finish
foam brush
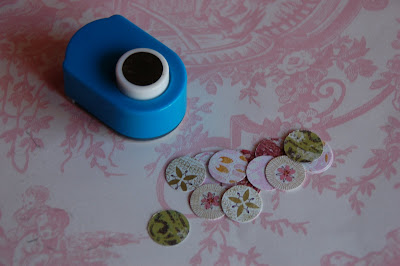
round and/or square paper punch - optional
round magnets
quick drying strong glue


First, punch out the paper that you want to use.


*If you don't have a paper punch that is the same shape as your glass marbles, you can apply a light coat of Mod Podge to the back of you marbles, set them on the front patterned side of the paper to dry, then use an exacto knife to cut around excess paper.

Second, apply a light coat of Mod Podge to the back of the marble and place the punched out paper on to it with the printed side of the paper to the back of the marble. Let it dry.


Third, add a coat of Mod Podge to the back of the paper and marble. Let it dry.


Fourth, make sure you have a helper to sort your magnets and other supplies.


Finally, add the magnet to the back with the strong glue.


That's it! I was thinking, especially with these bigger square marbles, you could use little stamps and stamp phrases or names on the front of the patterned paper before you adhere it to the magnet. Also, use an ink that can't smear easily, like the ones that go on fabric and wood. Just a suggestion. Okay, go at it and make them for the masses like I did.