Wednesday, April 29, 2009

i'm trying so hard


I over purchased just a bit on fabric, craft supplies and even thrifting over the winter.  Can you ever thrift too much?  Well, I did.  I would go in for just one thing and then end up with way more. So, my new spring resolution has me just using what I have.  It started with the shirt dresses and now I am trying to do it with many more projects.   I found this half cut pillow case (I'm not sure what I did with the top half) in my garbage bag (where I keep all my scraps) and saw a skirt.  Now, I didn't want to make it to fit the girl now since I think she is all set for a bit, but I did want something to grow in to.  I think this skirt will fit her when she is about 4, perhaps 5.  A little bit of a long wait, but worth it.  I just gathered the top of the skirt with a long running stitch and attached the top waist band to the gathered top.  I made the elastic a bit loose, so I can readjust it when she does get older and perhaps is a bit smaller than I anticipated.  That was easier than kicking myself for making it too small.  And, as usual, I added a small applique of a bird.  Necessary?  You decide!

Saturday, April 25, 2009

keeping up with the babies

I am very glad others are having babies.  I am pretty sure that our little family is complete (that's not in stone) and I get so much joy sewing baby items, so as long as my friends are having babies, I will be all right.

This first set is for a shower I just went to.  I couldn't decide if the turtle needed a mouth or not and in the end he did end up with one.  Sometimes these things become such hard decisions and really that turtle is just going ot have spit up and food on him, so does it matter?  The answer is yes! The bib is from a great pattern from juicy bits.                                                                                            

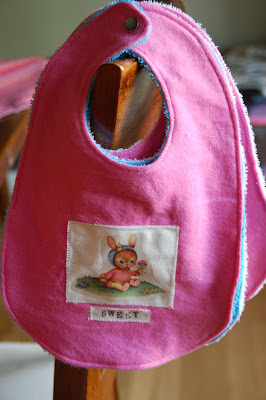
And, then like usual, once I cut one of something out, I just kind of go crazy and cut out a whole bunch with no real intentions of whom I am giving them to.  I got the terry cloth for the back of the bibs from some hooded baby towels that we no longer used.  

Thursday, April 23, 2009

tutorials and ideas for boys, boys, boys


First, thanks for all of your ideas.  It so nice to have so many resources these days.  I am amazed at how many times I go to the internet and search for a tutorial or a "how to" and get tons of results.  I am almost more amazed when just a few pop up instead of many.  I guess we are spoiled in this technology age.  Here are some of the ideas that you all steered me towards and a few of others that I have collected.  We definitely have enough ideas to not leave these boys out!!! 

1 - My college roommate and dear friend Mo found this one.  And, since it might be too late this year, gather all your yellow bunny peeps for next year's Pokemon party.  My boys still love Pokemon despite me trying to steer them in another directions - Pikachu pops from Bakerella.

2 - For boys and girls (but boys for now) this tutorial on how to make a outdoor (or indoor) tent from Boutique NutMeg found at Sew, Mama, Sew!

3 - The handsome Eddie Cap fom mushroom villagers that looks like it came straight out of the movie "Newsies."  Loved that movie and I think I would love seeing my four year old in this.  

4 - For those who have boys with DS Lites and need a way to keep those very small games organzed as well as found here is a DS Lite case that holds their games found at Instructables

5 - The superhero cape at Puking Pastilles.  I've directed many a non sewer over to this tutorial and they tell me this one is easy.  

6 - The bandana pants (could be for either, but again, we're saying these are for boys for this one) at blue yonder (thanks Wendi).   I also found this tutorial for a rubber band gun at blue yonder as well.  

7 - My boys have had a few of these marshmallow shooters from Santa and cub scout camp.  These directions are from Instructables.

8 - Here is a card table playhouse tutorial at Sew Much Ado.  We used to play for hours in one with just some blankets and sheets over the table - this one is cool.   

9 - The well known, but always fun, freezer paper stenciling.  I am sharing this tutorial because she has some cool boy designs in it.  It's from panjo kids.  You can find more tutorials at the artful parent and made.  

10 - Pillow cases!  Great way to make the boys something of their very own for their room with their favorite characters on it.  Here is a tutorial from Lazy Girl.  Also, here is one my friend at the Polka Dot Chair made at Christmas for her nephews.  They have pockets on them for their books.  My mom made us all individual pillow cases with a handle on top and a poket on the front.  We took these on our family vacations in the car and kept our puzzle and coloring books in the pocket.  I loved mine! 

Monday, April 20, 2009

yep, he does

My family and a few of my friends told me that those last photos of Gage make him look like the Incredible Hulk.  I have to agree.  Especially on that full body one.  His shoulders are bulky, not from muscles, but from injections of insulin because he has juvenile diabetes.  I didn't know that as first and thought my child had these incredible (yet misplaced) muscles!! He sometimes acts like the Incredible Hulk too, but definitely gentler and funnier.  I don't think Lou Farrigno was ever as funny as this kid is.  I'm just saying.  

Sunday, April 19, 2009

this kid cracks me up


Let me introduce you to my four year old. He can having me laughing and crying all in the same minute. Yesterday I took an intro SLR photo class at the local camera store. I won't be posting any fabulous photos any time soon, but I do know more about the settings on my camera and learned enough to practice with white balance, shutter speed, ISO, and aperture. I had fun being out and with my friend who gave me this class as a gift for my birthday. Now, we both want to take the next class that goes beyond. She is ready for it, but I still need mucho practice. I took these photos yesterday in the evening when I came home from the class. I was going through all the photos last night (many of them blurry after changing the shutter speed) and had to show my husband these ones of Gage. He is badly in need of a haircut (it grows like a wild man as soon as I cut it) and I don't know why his shirt is missing, but that's just how he rolls!

Friday, April 17, 2009

florida apron


I am gearing up for the all my family (sisters, sister in laws, brothers, parents etc.) birthdays in May and June.   I came from a family of eight where everyone's birthdays were in April, May, and June except for me and my brother.  Then, I married in to a family with the exact same situation.  My husband and I get old every year in December while the rest of our family members  do that in the spring and summer.  So, it's like gearing up for Christmas, I am trying to get some things made and sewn early.  I found this Florida fabric and knew I would make something for my sister in law in Miami with it.  I started out making a tote bag, but then last night as I went to cut it out, I thought it needed to be an apron.  I took my favorite apron (the emmeline apron my mom made me) and made a pattern based on that shape.  I didn't have the guts to follow the true emmeline apron directions and make bias tape and pleats that it calls for.  Someday.   I have some sewing fears that I need to get over and hand sewing bias tape (especially making my own) on something is one of them.  

The apron is reverseable with the Floirda fabric on one side and navy gingham on the other.  I liked how it turned out, but I need to fine tune the pattern a bit for the next apron I make.  

Wednesday, April 15, 2009

wooden girls

I have wanted to paint clothes pin dolls for awhile. There's a tutorial on my sidebar that was waiting to be followed from the going sew crazy blog. I have also wanted to make some little wooden doll candle holders for the top of cupcakes. I have managed to do make a few of these. The little doll heads and bodies have been sitting in my kitchen for awhile because it's one of those projects I do a little at a time. I paint a coat of hair...leave it to dry....add some eyes...paint another clothes pin body...you get it. I have probably had these out for 2 weeks. Finally I got some sprayed with lacquer and had my husband drill some holes in the top of some of their heads. The candle holders still need a few things, so I will post those soon, but here's what I did finish...


A little girl's necklace for Gage's friend's birthday (he says she loves him). She also got this kidlet (with out a pocket - that's another story) filled with classic Golden Books full of Disney princesses that I found at my beloved Half Price Books.


I also finished several clothespin dolls. I am trying to figure out a way to add a skewer to the bottom (or something) of the clothespin dolls to make them cake toppers. Or drill a hole in their heads for a candle. We'll see. I actually plan on putting a few things in an etsy shop soon. Just the extras that I make around here that I don't end up giving away. Nothing much, but soon perhaps.

*Oh, and thanks for the suggestions on the boy craft/sewing projects. I am going to collect them and post a link for all of them soon.

Tuesday, April 14, 2009

did you know i have boys too?

I will admit, I generally (always) sew and craft around the youngest - our little girl. But, I do have boys and I am constantly trying to find things I can make for them that they will truly like. They have many pairs of pj bottoms, pj shorts, and t-shirts that we have made. But, I am still on the look out for things a 10 year old, a 7 year old, and a 4 year old will wear or use. Let me know if you have any of those projects. I do care for them as much as I do for Mallory, but I will admit that I have really enjoyed sewing for Mallory much more. Dresses and dolls are fun to make. But, I know that I will find some projects for those boys soon. I thought I would share a few photos of them from our egg dying on Saturday. The oldest is trying to grow up fast and thinks he is a bit old for these sorts of traditions, but I am not letting him out of them for as long as I can. You have to let them feel young for as long as possible because growing up does come quickly and you can't go back. So, here are a few photos of Trevor, Boston, and Gage - my boys.


And, here is what the youngest looked like by the end of the day after she had raided the candy in her basket. The Easter Bunny was kind enough to bring her that Dora hat!

Monday, April 13, 2009

irish bread pudding with caramel sauce


photo from Cooking Light

Here is the edited recipe for the Irish Bread Pudding. Now, it is from Cooking Light and I have made all the substitutions to take out the alcohol. You can find the original here. It is supposed to be Caramel-Whiskey Sauce, but seeing as we don't have alcohol in this house or use it ever, then, I substituted in the apple juice in the bread pudding recipe and out the whiskey. In the Caramel Whiskey Sauce, I took out the whiskey and put in imitation rum. The sauce ends up tasting like butter rum LifeSavers. So good. It also makes a lot, so be prepared for extra sauce.

Ingredients
  • 1/4 cup light butter, melted
  • 1 (10-ounce) French bread baguette, cut into 1-inch-thick slices
  • 1/2 cup raisins
  • 1/4 cup apple juice
  • 1 3/4 cups 1% low-fat milk
  • 1 cup sugar
  • 1 tablespoon vanilla extract
  • 1 (12-ounce) can evaporated skim milk
  • 2 large eggs, lightly beaten
  • Cooking spray
  • 1 tablespoon sugar
  • 1 teaspoon ground cinnamon
  • Preheat oven to 350°
Brush melted butter on one side of French bread slices, and place bread, buttered sides up, on a baking sheet. Bake bread at 350° for 10 minutes or until lightly toasted. Cut bread into 1/2-inch cubes, and set aside.
Combine raisins and apple juice in a small bowl; cover and let stand 10 minutes or until soft (do not drain).

Combine 1% milk and next 4 ingredients (1% milk through eggs) in a large bowl; stir well with a whisk. Add bread cubes and raisin mixture, pressing gently to moisten; let stand 15 minutes. Spoon bread mixture into a 13 x 9-inch baking dish coated with cooking spray. Combine 1 tablespoon sugar and cinnamon; sprinkle over pudding. Bake at 350° for 35 minutes or until set. Serve warm with Caramel Sauce.

  • Caramel Sauce

    • 1 1/2 cups sugar
    • 2/3 cup water
    • 1/4 cup light butter
    • 2 ounces 1/3-less-fat cream cheese (Neufchâtel) (about 1/4 cup)
    • 1/4 cup imitation rum extract
    • 1/4 cup 1% low-fat milk


Combine sugar and water in a small heavy saucepan over medium-high heat; cook until sugar dissolves, stirring constantly. Cook an additional 15 minutes or until golden (do not stir). Remove from heat. Carefully add butter and cream cheese, stirring constantly with a whisk (mixture will be hot and bubble vigorously). Cool slightly, and stir in rum extract and milk.

happy easter


I hope your Easter day was beautiful. Our day was so nice - filled with sun and time together. I will have to share the dessert we had last night for dinner with you. It's one that I can't help eating too many servings of - Irish bread pudding with caramel sauce. I'll share the recipe soon.

Saturday, April 11, 2009

for good measure


One more. I think I am done sewing her these dresses for now. I will wait and save the rest of my husband's discarded shirts until she needs a size 3. Then, I am sure that I will be sewing many again. This one I really like. I keep saying that about all of them. I think the daddy daughter thing has a lot to do with it because this one and the last one were two shirts that my husband wore a lot. So, seeing her in it makes me smile. I made the sleeves like the last few shirts I have sewn with the ruffle on the end with the elastic gathering above that. I added the matching fabric band to the bottom because I wanted to add a bit of length so maybe this one can last until next summer. Overall, this upcycling project really gives you a great dress with so little effort. Love it.


Thursday, April 9, 2009

another amazing (do i use that word too much?) tutorial

photo from the polka dot chair

Melissa is a awesome seamstress. She has another tutorial on her blog for a skirt. This one is made with a charm pack. She used pink madras plaids which looks so preppy and sweet. Check it out here at the polka dot chair blog.

Wednesday, April 8, 2009

the others

Before I show you the other two shirts, you have to check out the tutorial by dana at made for the shirt dress. It is so clear and easy to follow, not to mention the shirt she used was sear sucker which turned out adorable. You will love making these. They are addicting. And, thanks for all you nice comments about the strawberry shirt. It's one of my favorites. The fabric was so great to begin with, so anything made out of it would have been cute.


I made a brown and pink one and cut out a little girl to applique from the Paper Dolls line from Windham Fabrics. I liked it and then I added the applique and I really liked it.


I had left over fabric from a vintage sheet that I used for a pair of lounge pants earlier and I loved the yellow tulips. I paired it with this yellow sear sucker that a lovely person sent to me from England. This shirt reminds me of the wall paper I had in my room when I was little. It was yellow floral, but it was textured and felt fuzzy when you touched it. I loved it and it was the 70's so this shirt seems to have that 70's vibe.


I quickly added these butterflies to one of Mallory's shirts. I was watching Martha while working out the other day (started a new program with my sister that I am really hoping to stick to) and saw that she used this butterfly template to iron on some patches on to stained clothing. Easy. I can do that. Simple in the key here!

Tuesday, April 7, 2009

my machine is taking a break


I found this pattern in my stash and I decided to try out this past weekend. It is Simplicity 5118 and I made view C. I had some vintage strawberry fabric that my mother in law gave me (she has so many treasures that she give to me). I paired it with this white with black polka dot fabric. I didn't want to add the flounce on the bottom (and left out the ties on the back as well) so I just added another band of the white and black fabric. I love it because it had a nice peasant style fit plus it took so little fabric. So, I decided to cut out two more so she could have a few for the summer to wear with capris. I used a vintage sheet, some sear sucker from a friend, and a few other scraps to make two more shirts. When I was at the very end of enclosing the neck casing on both of them, my machine kind of decided it was on vacation. I get it...I have used it way too much and I am not always that nice to it. It just involves a loose screw and a spring that I am pretty sure my husband can figure out, but it amazing how weird I feel knowing it can't be used. I will post the other two tomorrow when I finish the neck casing. I am counting on sun tomorrow too.

*I took so long writing this - I got the kids in bed in the mean time - that my wonderful husband has already fixed my sewing machine. Hurray!

Sunday, April 5, 2009

a few tips for starting your dress from a man's shirt

I wanted to share a few tips on how to get started on your dress from a man's shirt. I know you are going to make one because it is so easy to do. I don't sew anything that is hard - someday I will challenge myself more, but for now it's all about getting it done quickly.

When picking a shirt, the bigger the better. The more fabric you have to work with, the easier it will be to cut out. This will also make it so you have enough fabric in the sleeves of the shirt to make new sleeves for the dress.

Taking off the pocket - if there is one, unpick it off. Gently press the area where the pocket was with steam to minimize the holes that might be left. If they are too large, you can always turn it around and put the buttons on the back.


Cutting up the shirt - go right along the side seam and cut. Go along the seam until you reach the collar. Cut off the collar.


Cutting off the sleeves - cut off the sleeves following the seam as close as possible.


This is what you will have - a front and a back panel to use to cut the dress out of.


Now, with the piece of fabric that has the buttons down the middle, fold in half as close to the middle as possible. Iron in between the buttons. Now, pin it together so that it stays in place while you cut out you pattern piece.


Now, here is my homemade pattern piece based on the Simplicity pattern 5695. I have taken view D and added 4 inches to the bottom of the dress. I eliminated adding the ruffle on the bottom that it calls for as well. I also widened it about 1/2 from the middle of the pattern piece down to the hem. But, other than that, I pretty much follow the directions from the pattern.

One last tip - take the sleeves from the shirt that you cut off earlier and cut along the bottom seam to open them up. There should be enough fabric there to get two sleeves for your new little dress.

Since I follow the pattern for the rest of the directions, I can't really qualify this as a tutorial. If you have any questions, don't hesitate to ask. I will help you as much as I can.

Saturday, April 4, 2009

the first kidlet


This is the first kidlet I made from jc handmade's tutorial. It is the one I made that made me revamp the measurements and come up with this. I gave it to a friend who is expecting a new baby boy soon and used it as the gift bag for the outfit. I think if you had hooks above the change table and had these hanging from them full of lotions, diapers, and other baby essentials, it would be so cute. I like the beefed up version for books for older kids because my kids books are heavy and they have A TON.